目次
参考
- Unityでカメラの向きを基準に移動する方法と、追従して回転できるカメラの実装
- Unityでオブジェクトを回転させる方法まとめ
前提
- Unity 2019.1.0f2
- SteamVR Plugin 2.2.0
- 割と単純実装
- Unity:VRゲームを作ってみたい/02-SteamVR:OculusTouchのコントローラーの情報を取得してみるの続き
1.地形に追従させたいので、Cupsuleの追加とRigidbodyコンポーネントの追加 ※[CameraRig]は追加したCapsuleにぶら下げる
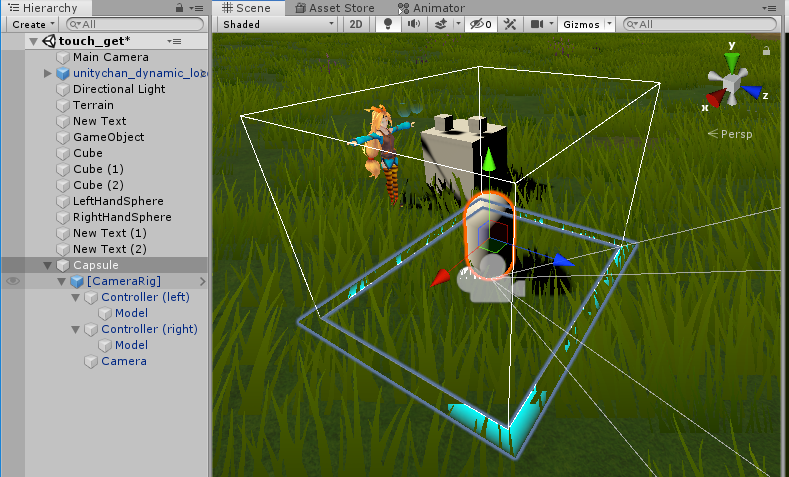
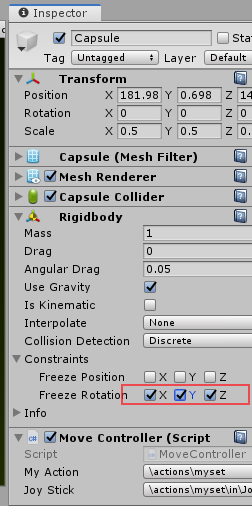
2.CupsuleのRigidBodyは倒れたり、勝手に向きが変わったりしないように Freeze Rotation は全てチェックしておく
3.新しくC#のスクリプトを起こして、両手のスティックの入力に従って向きの変更(45度単位とする)とカメラの向いている方向に対する移動の処理を記述する。
using System.Collections;
using System.Collections.Generic;
using UnityEngine;
using Valve.VR;

public class MoveController : MonoBehaviour
{
    public SteamVR_ActionSet myAction;
    public SteamVR_Action_Vector2 JoyStick;
    public SteamVR_Action_Boolean JoyStick_Click;
    public TextMesh debug;

    private SteamVR_Input_Sources handTypeLeft;
    private SteamVR_Input_Sources handTypeRight;
    private bool rotating;

    Rigidbody rb;
    public Camera cam;
    float moveSpeed = 3f;

    // Start is called before the first frame update
    void Start()
    {
        handTypeLeft = SteamVR_Input_Sources.LeftHand;
        handTypeRight = SteamVR_Input_Sources.RightHand;
        myAction.Activate(SteamVR_Input_Sources.Any);
        rb = GetComponent<Rigidbody>();
    }

    // Update is called once per frame
    void FixedUpdate()
    {
        string msg = "";
        msg += "** object=" + rb.name + "\n";

        //---------------------------------------------------------------------
        // 両手のスティックの状態を取得する
        //---------------------------------------------------------------------
        Vector2 stickLeft = JoyStick.GetAxis(handTypeLeft);
        bool stickLeftClick = JoyStick_Click.GetState(handTypeLeft);
        Vector2 stickRight = JoyStick.GetAxis(handTypeRight);

        //---------------------------------------------------------------------
        // 視点の回転に関する処理
        //---------------------------------------------------------------------
        msg += "[rotate control info]\n";
        msg += "  x=" + stickRight.x + "\n";
        msg += "  rotating flag=" + rotating + "\n";
        msg += "  Body Quaternion=" + transform.rotation + "\n";
        msg += "  Cam Quaternion=" + cam.transform.rotation + "\n";

        // 右スティックのXが -0.9 を超えたなら左45度回転する
        if (stickRight.x < -0.9 && rotating == false)
        {
            rotating = true;
            transform.Rotate(0, -45f, 0, Space.Self);
        }

        // 右スティックのXが 0.9 を超えたなら右45度回転する
        else if (stickRight.x > 0.9 && rotating == false)
        {
            rotating = true;
            transform.Rotate(0, 45f, 0, Space.Self);
        }
        // 右スティックが視点回転方向から戻されたと判断したらフラグ解除して次の入力を受け付ける
        else if (stickRight.x >= -0.9 && stickRight.x <= 0.9 && rotating == true)
        {
            rotating = false;
        }

        //---------------------------------------------------------------------
        // 視点方向に移動する処理
        //---------------------------------------------------------------------
        msg += "[Move control info]\n";

        // カメラの向き算出
        Vector3 cameraForward = Vector3.Scale(cam.transform.forward, new Vector3(1, 0, 1));
        msg += "  camera forward=" + cam.transform.forward + "\n";
        msg += "  calc camera forward=" + cameraForward + "\n";

        // 左スティック入力から移動ベクトル生成
        Vector3 moveForward = Vector3.Scale(cameraForward * stickLeft.y + cam.transform.right * stickLeft.x, new Vector3(1, 0, 1)).normalized;
        msg += "  calc move forward=" + moveForward + "\n";

        // 左スティックが押されていたらダッシュ扱いでmoveSpeedをxx倍にする
        float currentSpeed = moveSpeed;
        if (stickLeftClick)
        {
            moveSpeed *= 3.0f;
        }

        // オブジェクトに設定
        rb.velocity = moveForward * moveSpeed + new Vector3(0, rb.velocity.y, 0);
        moveSpeed = currentSpeed;

        //---------------------------------------------------------------------
        // Debug用のText領域が指定されていたら設定する
        //---------------------------------------------------------------------
        if (debug != null)
        {
            debug.text = msg;
        }
    }
}
4.スクリプトに必要な変数設定して終わり。DebugのTextMeshは指定してもしなくても良い。
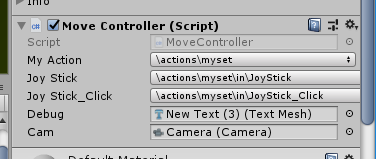
うまくカメラの方向が取れないと思ったら違うカメラのインスタンス参照してただけだった…